In this article I will show how to modularize your framework features using Swift and Objective-C, while keeping them optional, allowing to compose flexible solution from any subset of them in a closed source setup.
Imagine that you are developing an SDK. Your framework wraps up some work and exposes a public API to its users. To be a decent SDK, it should:
These points are sometimes hard to balance, and a lot of times it would require some compromises, usually between usability and "feature richness."
The obvious solution is to modularize your SDK. It is a common and extremely flexible approach, allowing to split your framework into smaller, feature-based items. It usually looks something like:
Please note that features can also depend one on another
I thought this setup solves all the possible cases. Well, most of them, but certainly not all.
After publishing my last article (https://medium.com/@amichnia_31596/creating-swift-framework-with-private-objective-c-members-the-good-the-bad-and-the-ugly-4d726386644b), I did not think I would go back to closed source frameworks topic again soon. Well, I was wrong :)
I got an interesting question from someone who read my previous post and seemed to work on a closed source SDK product as well. I will try to state the requirements here:
Note: vendors frameworks are a way to distribute closed source frameworks with cocoapods. That means that the code is somewhat "sealed," not revealing the actual implementation to the user. It is very common when your product performs custom processing, and allows to protect the company's IP.
Link to the original question on StackOverflow: https://stackoverflow.com/questions/55077857/if-canimport-does-not-find-frameworks-with-cocoapods/55560102#55560102
To make it more clear how should it look, let's put up an example. Let's imagine our framework, MainSDK, provides a NumberInspector class. An end user could ask it to inspect some number and expect to get notified with a list of its features (even, odd, positive, etc.)
// MainSDK

public class NumberInspector {
    public weak var delegate: NumberInspectorDelegate?
    ...
    public func inspect(number: Int) {
        // perform  inspection and notify delegate when done
    }
}

public protocol NumberInspectorDelegate: class {
    func didFinishInspecting(number: Int, foundFeatures: [String])
}
There is also a 3rd party framework; let's call it AdditionalSDK. It provides API to detect if a given number is prime. Then it notifies its delegate.
// AdditionalSDK

@objc public class PrimeNumberChecker: NSObject {
        @objc public var delegate: PrimeNumberCheckerDelegate?
        @objc public func inspect(number: Int) {
    ...
    }
}

@objc public protocol PrimeNumberCheckerDelegate {
    func didFinishInspecting(number: Int, isPrime: Bool)
}
We want to alter the behavior of NumberInspector in a way, that if MainSDK user is also using AdditionalSDK, we will perform additional detection, and add information about being prime to detected features. If the other framework was not added though, we expect that our number inspector would still do the job, just without this particular feature.
The obvious solution for Swift seemed to be a conditional compilation. In most of "open source" setups (when the SDK sources are compiled together with target app sources) it could look like this:
// MainSDK
#if canImport(AdditionalSDK)
import AdditionalSDK

public class NumberInspector: PrimeNumberCheckerDelegate {
    ...
}
#else
public class NumberInspector: {
    ...
}
#endif
Whenever the user builds his app, SDK gets compiled and canImport(..) would be evaluated, resulting in compiling a slightly different code.
There are several significant problems with this setup:
To sum it up - canImport was designed for a different purpose and should not be used in this context.
Note 1: this setup is very vulnerable to issues with derived data. You need to clean almost every time you add/remove a feature. Because
canImport(...)evaluates based on module availability, it can trigger 'false positives' when additional SDK is still in the derived data.Note 2: by "open source" setup I mean situation, when you either ship sources directly, or via cocoapods. And then the SDK sources are compiled together with the target app.
The general idea is that in Objective-C you can do something like:

Weak linking (Optional) means that you can build against the module, which would not be automatically linked. You will be able to build the target app, regardless of adding or not the optional framework. Its availability is resolved in the runtime, and its symbols would evaluate to nil if it is not there.
// Below would import or not, depending on whether it is linked
@import AdditionalSDK;

...

+ (BOOL)additionalModuleAvailable {
    if ([AdditonalSDK class]) { // Or any class from additional SDK
        return YES;
    } else {
        return NO;
    }
}
Note: Please note, that above would work ONLY in Objective C. I did not find a way to achieve this with pure Swift. The good old Objective-C runtime could be a lifesaver :)
The final solution would very much look like following.
We would declare "Interop" classes, written in Objective-C, to take advantage of its runtime and wrap additional feature frameworks interoperability within.
// AdditionFrameworkInterop.h

#import <Foundation/Foundation.h>
#import <MainSDK/MainSDK-Swift.h>

@interface AdditionFrameworkInterop : NSObject

@property (weak, nonatomic) id<InteropDelegate> delegate;

+ (BOOL)additionalModuleAvailable;
- (instancetype)init;
- (void)inspectWithNumber:(NSInteger)number;

@end
// AdditionFrameworkInterop.m
#import "AdditionFrameworkInterop.h"
@import AdditionalSDK;
// You can adopt protocols from additional framework even if its weak linked
@interface AdditionFrameworkInterop() <PrimeNumberCheckerDelegate>
@property (strong, nonatomic) PrimeNumberChecker *primeChecker;
@end
@implementation AdditionFrameworkInterop
+ (BOOL)additionalModuleAvailable {
...
}
- (instancetype)init {
self = [super init];
if (self && [AdditionFrameworkInterop additionalModuleAvailable]) {
_primeChecker = [[PrimeNumberChecker alloc] init];
[_primeChecker setDelegate:self];
}
return self;
}
- (void)inspectWithNumber:(NSInteger)number {
if ([AdditionFrameworkInterop additionalModuleAvailable]) {
[_primeChecker inspectWithNumber:number];
}
}
- (void)didFinishInspectingWithNumber:(NSInteger)number isPrime:(BOOL)isPrime {
[_delegate didFinishInspectingWithNumber:number isPrime:isPrime];
}
@endUsage in MainSDK is straightforward. You use interop class as if you would use AdditionalSDK directly. Of course first check its availability, with interop.additionalSDKAvailable() call.
The whole idea is to proxy AdditionalSDK features via Objective-C class. Then we can treat it as a truly weak linked framework, and inspect its availability in runtime. Also, it allows you to declare conformance to "optional" protocols (by optional I mean they might be there or not).
It is possible to extend and change the behavior of your closed source SDK depending on whether additional frameworks were added. That gives flexibility, both to you and your SDK users, to shape the specific feature set needed.
The full project is available at my GitHub: https://github.com/amichnia/Swift-framework-with-optional-frameworks
Some final thoughts:

Timothy Anderson Design: www.timothyandersondesign.com
I was recently working on a closed source Swift framework. Unluckily, some parts of the code were in Objective-C (relying on pure C libraries). In this article, I highlight some of the problems when having frameworks with mixed Swift/ObjC code. I show some approaches I tried when struggling to make ObjC code internal. Making it invisible to the framework users, but still accessible from the Swift code gave me a severe headache. Also, I share a solution that finally worked out in my case.
There are a lot of articles and tutorials about Swift/ObjC interoperability, but they rarely focus on framework targets. It seems that even when you have everything in place, it is still close to impossible to effectively hide your Objective-C part from framework users (at least as long as you want to expose it to the Swift part).
Let's assume you created a framework, named MyFramework, with following members:
// MyPrivateClass.h

@interface MyPrivateClass: NSObject

- (void) doSomethingInternalWithSecretAttribute:(NSInteger)attribute;

@end
// MyPublicClass.swift
public class MyPublicClass {
private let privateClass: MyPrivateClass // We need private ObjC member
...
public func doSomething() {
privateClass.doSomethingInternal(withSecretAttribute: 314)
}
}Our Swift class depends on Objective-C class, so it needs to know about it somehow. However, we don't want the client app to be able to see our ObjC internals:
// Somewhere in the wild west
import MyFramework

...

// This should work
let publicClass = MyPublicClass()
publicClass.doSomethingWithPrivateClass()

...

// This should not be possible, nor even compile,
// as it should not be able to see MyPrivateClass !!!
let privateClass = MyPrivateClass()
privateClass.doSomethingInternal(withSecretAttribute: 13)
Seems easy, right? Well, it is actually harder than it looks.
TL;DR
- we have a mixed Objective-C, C (or C++), Swift framework target
- we need to expose Objective-C members to Swift code internally
- we don't want framework users, to see our internal ObjC members
By good, I mean "default" Swift ObjC interoperability. Just for a short recap:
You can read more about it here:
There is one significant problem with this approach:
"Swift sees every header you expose publicly in your umbrella header. The contents of the Objective-C files in that framework are automatically available from any Swift file within that framework target, with no import statements."
So it does not provide the desired behavior. Moreover, I noticed that quite often it leads to a chain of "including non-modular header" issues. That literally makes you rewrite half of the headers. It is still doable, as long as you don't import any header that is out of your control, for example, headers from some static library. Summing up:
Pros:
Cons:
When searching for a possible solution, this is one of the most popular. It relies on creating a private modulemap file, that defines explicit submodule. I don't want to get too much into details on how to do it, here are some useful links:
In quick words - you can manually define an explicit submodule with private header files, named for example MyFramework.Private. Then you access it from your Swift code as following:
// MyPublicClass.swift
import MyFramework.Private // Required to see "private" header

public class MyPublicClass {
    private let privateClass: MyPrivateClass
    ...
It is not very private though as it would also work for the framework user:
// Somewhere in the wild west
import MyFramework
import MyFramework.Private

...

// This should not be possible, nor even compile,
// as it should not be able to see MyPrivateClass
let privateClass = MyPrivateClass()
privateClass.doSomethingInternal(withSecretAttribute: 13)
Framework users still can access "private" members. It is a bit harder, since importing the main module does not reveal "private" members immediately. It also requires an additional import statement to access "private" members. You can emphasize that it is not safe nor intended to use it. However, you cannot hide it.
To sum it up:
Pros:
Cons:
In my case, the modulemaps were not enough. The research output wasn't promising. It seemed that there is no way to expose Objective-C headers privately, inside the same framework target only, without making them more or "less" public. So it is true so far.
You might wonder what I did have in mind then when writing about finding a solution that works. Let me share a part of a discussion I had with myself:
Me: "Ok, let's think again, what do you want to achieve?"
Me2: "I want to expose Objective-C headers to Swift, but only inside the framework target, without exposing them to the framework users."
Me: "Do you? Is that exactly what you need?"
Me2: "Well, I have ObjC classes that are meant to be internal, but I want to use them from Swift code."
Me: "OK. How would you actually 'use' this classes?"
Me2: "Call some methods, access variables?"
Me: "Do you need to 'know the class' to do that?"
Me2: "Well, I only need to know that there is a method or a variable, so protocol should be fine."
Me: "And if you invert the problem? Can you have an internal Swift member and use it from Objective-C."
Me2: "It seems that the answer is yes, with some restrictions of course."
Me: "OK. Can you make then the private Objective-C member adopt an internal Swift protocol?"
Me2: "Seems so... Does it mean I don't need to know about any Objective-C class, as I interact only with things adopting Swift protocols?
Me: "Well, let's try."
Let's update the framework a bit according to that idea. The swift code does not have to see the Objective-C part at all. However, it can operate on anything adopting protocol matching our ObjC class features:
// ObjectiveCToSwift.swift

@objc(MyPrivateClassProtocol) // Under this name this will cross Swift->ObjC boundary
internal protocol MyPrivateClass {
    init()
    func doSomethingInternal(withSecretAttribute: Int)
}Because MyPrivateClassProtocol is internal, it would not be a part of MyFramework-Swift.h by default. So let's created an additional header for linking all our internal Swift and ObjC members:
// SwiftToObjectiveC.h

#ifndef SwiftToObjectiveC_h
#define SwiftToObjectiveC_h

SWIFT_PROTOCOL_NAMED("MyPrivateClassProtocol")
@protocol MyPrivateClassProtocol

- (nonnull instancetype)init;
- (void)doSomethingInternalWithSecretAttribute:(NSInteger)attribute;

@end

#endif /* SwiftToObjectiveC_h */
Note: If you are unsure how should you fill this header, you can make Swift members public and build. That generates 'ModuleName-Swift.h' header in derived data. Inspecting it should give you some sense of how to do it. Then make it internal again.
Now as we can see Swift protocol in Objective-C as MyPrivateClassProtocol, we can adopt it.
// MyPrivateClass.h
#import <Foundation/Foundation.h>
#import <SwiftToObjectiveC.h>

@interface MyPrivateClass : NSObject<MyPrivateClassProtocol>

- (void) doSomethingInternalWithSecretAttribute:(NSInteger)attribute;

@end
That leaves us with one last final problem..
Me2: "OK, I theoretically can use it. But again, how do I get an instance of it if I don't know about a class adopting protocol?"
Me: "Remember that factory pattern?"
The problem with the solution above is that we just cannot instantiate a new instance of a Protocol without using the init on a concrete class, can we? Let's consider this:
protocol SomeProtocol {
    init()
}
class SomeClass: SomeProtocol {
    ...
}

// This will work
let instance: SomeProtocol = SomeClass.init()

// This won't work
let instance: SomeProtocol = SomeProtocol.init()

// Surprisingly, this also works
var type: SomeProtocol.Type!                // Expose from Swift
type = SomeClass.self                       // Move it to ObjC!
let instance: SomeProtocol = type.init()    // Use in Swift
Let's focus on the last part. We can create a helper factory class, that holds MyPrivateClass.Type:
@objc(Factory)
internal class Factory {
    private static var privateClassType: MyPrivateClass.self! // Protocol

    // Expose registering class for protocol to ObjC
    @objc static func registerMyPrivateClass(type: MyPrivateClass.self) {
        privateClassType = type
    }

    // Factory methods
    func createMyPrivateClass() -> MyPrivateClass {
        return privateClassType.init()
    }
}
Note: In Swift part, MyPrivateClass is a protocol, while in ObjC it is a class. It might seem ambiguous, but I wanted to keep same names on both sides.
Factory above would be exposed to Objective-C in the same way as the MyPrivateClass Protocol definition (so internally).
The one last thing that needs to be done is to register the Objective-C class to be used by the factory. We need to do it before we could use it.
Luckily, Obj-C runtime has something just up to the job:
// MyPrivateClass.m
#import "MyPrivateClass.h"

@implementation MyPrivateClass

@synthesize privateProperty;

+ (void)load {
    // This is called once, when module is being loaded,
    // "Invoked whenever a class or category is added to the Objective-C
    // runtime; implement this method to perform class-specific behavior
    // upon loading."
    [Factory registerPrivateClassTypeWithType:[MyPrivateClass class]];
}

- (void)doSomethingInternalWithSecretAttribute:(NSInteger)attribute {
    NSLog(@"INTERNAL METHOD CALLED WITH SUCCESS %ld", (long)attribute);
}

@end
So it seems, that we can use Objective-C members in Swift without exposing ObjC code to Swift at all! All we need to do is to expose the Swift part to Objective-C, which we can do internally 😎.
Let's sum it up:
Pros:
Cons:
The example project is available on the GitHub: https://github.com/amichnia/Swift-framework-with-private-ObjC-example
The whole approach requires some manual work and forces to redesign how you initialize your dependencies slightly. You need to generate protocols, manually bridge it to ObjC, and also maintain factory along the way. However, this is the only way so far have genuinely internal Objective-C implementation and use it in the Swift code.
Note: In the example, I used the factory that allows you to register a type, and then I used init on that type. You can play with this approach a bit. If you don't like to add inits to protocols, you can try to use closure/block as a factory:
static var createPrivateClass: (() -> MyPrivateClass)!
Special thanks to Timothy Anderson, for allowing me to use his illustrations in this article.
App Environment abstraction in iOS.
In this article, I will propose an app environment abstraction. I will also show a small trick to improve your communication with testers, whenever multiple configurations come into the picture. And there is a nice bonus waiting at the end.
When you build a target in your project, you usually use some scheme (noticed this little dropdown next to the run button?). If you inspect it a bit more, you'll find, that among all the other things it does, it also ties your target (or targets) with a Build configuration. I will call it configuration.
By default, new Xcode projects have two configurations:
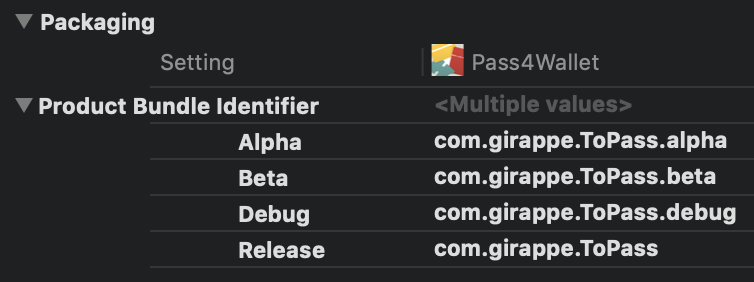
When inspecting your target build settings, you will notice that every entry could be defined with different values for each configuration you have. You can also use it to specify (among many others):
Because of that, build configurations are often used as a decent equivalent of the app environment, whatever that means in your context. It often looks like:
To achieve that, all you need is to create new configurations and set the settings respectively:
When talking about a development setup including multiple backend and app environments, configurations become lifesavers and a good way to set up and build an app to meet multiple requirements.
The problem arises when we start considering the main reason why we explicitly set the app environment.
They are meant to be different!
That means that Alpha version should be somewhat different to Beta, and for sure there are meaningful differences between Debug and Release. As long as it is about other API URL or some assets, it is fine. But when they differ in actual features provided, then it can backfire.
I'm sure you've seen this code at least once:
#if DEBUG
  // Do something
#else
  // Do something else
#endif
It is not that bad yet. Just have in mind, that (in most cases) the code after #else would not be checked until you start archiving or build in Release. So it already loses some compile-time safety. And considering this:
#if DEBUG
  // Debug flow
#elseif AlPHA
  // Was menat to be Alpha flow
  // But there is a typo that compiler will never highlight
#elseif BETA
  // Beta flow
#else
  // Should be Release, right?
  // unless we've added more configurations
  // and forgot to handle them
#endif
It could theoretically happen in many places in the code. Every adding/removing configuration requires to potentially revisit these places, rechecking the flow. With no help from the compiler, the code quickly becomes unmaintainable.
Another topic is unit testing - have fun writing tests for that. I had :)
I was struggling with this problem in many different projects. Regardless of better or worse approaches on feature toggles, I quite often ended with something like:
public enum Environment: String {
    case debug
    case beta
    case release
    public static var current: Environment {
      #if DEBUG
      return .debug
      #elseif BETA
      return .beta
      #else
      return .release
      #endif
    }
}

...

switch Environment.current {
    case .debug:
      // flow 1
    case .beta:
      // flow 2
    case .release:
      // flow 3
}
Now there is only one place to maintain the conditional compilation. And it is so straightforward, that it makes it easier to keep it sane.
The code is always compiled as a whole, giving significantly more compile-time safety. If we add/remove environment, the compiler will highlight major problems. This model could be used to represent the app environment. And it can be extended with some common boilerplate and environment dependent variables:
extension Environment {
    var name: String { return self.rawValue }
    var appVersionNumber: String { ... }
    var appBuildNumber: String { ... }
    var apiUrl: URL { ... }
}
And last, but not least, allow overriding Environment.current (for example for tests, but not only):
public enum Environment: String {
    case debug
    case beta
    case release
    public static var current: Environment {
        if let override = Override.current {
            return override
        }
        #if DEBUG
        return .debug
        #elseif BETA
        return .beta
        #else
        return .release
    }

    struct Override {
        static var current: Environment?
    }
}
...
Environment.Override.current = .betaIf you work on an app that has multiple build configurations with all that staging and pre-productions setups, or if you ever will, you'll eventually encounter this problem:
"Hi Andrzej, client send us a screenshot, could you look at it? Best,"
Nobody knows if it was taken on Alpha or Beta, not saying about the version number. Even if these data are logged in the ticket, I found them inaccurate more than once (testers are people after all, and if they take dozens of screenshots a day from multiple apps and multiple environments, it's easy to mismatch it)
As promised, there is a small trick that will make your life easier. Consider these three screenshots:
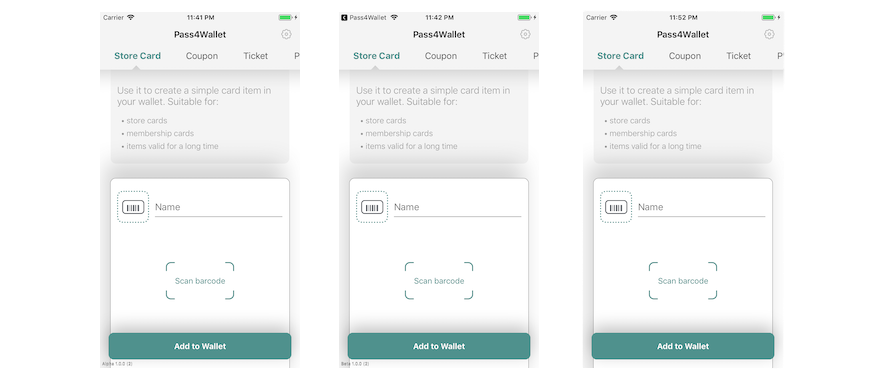
You can spot a difference between the first two and the third one. Let me zoom that for you:

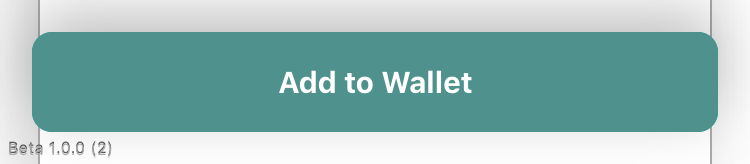
Noticed this small label? Contains everything I need to determine the app version used. The third one is empty because it is Release, which usually means it's an AppStore version. It is less dynamic due to the longer release cycle, so it should be easier to track.
It might seem kind of obvious, most of you have probably placed some version and build numbers already somewhere in the app.
This setup is a bit different though since the label is placed in separate UIWindow, even above alert level. That means that it should be visible on the screenshots from every single place in the app.
A gist with an example implementation:
If you were as lazy as me, and you'll be writing this Environment enum for the N-th time this year, you'll consider at least reusing it. But it's a hard job, as the configurations are dynamic and varying between projects. That's why I decided to automate the process instead.
I created a Command Line Tool in Swift, that will read your xcodeproj and generate that Environment class for you. It will also add the Swift compiler flags if they are missing. All you need to do is:
$ mint install GirAppe/AutoEnvironment
$ autoenvironment -p path/to/project.xcodeproj -o /output/dir
Add "-t target name" if the target name is different than project filename. That will generate default version of Environment.generated.swift file containing Environment enum (it's configurable - if you want to check other available options use "-h" for help).
If you want to see the version info label with the environment, just use:
// Example setup
Environment.setVersionFormat(.full)    // optional setup
Environment.info.textAlignment = .left // optional setup

if Environment.current != .release {
    Environment.info.showVersion()
}
The tool could be found at: https://github.com/GirAppe/AutoEnvironment
P.S. If you have noticed that I've just slid over feature toggles topic, it's because they are a nice feature, deserving additional article. I'm working on it now, so stay tuned.